
|
|
ICC Home / Members / Meetings / Peer Support / Documentation / Projects
Desktop Deployment: |
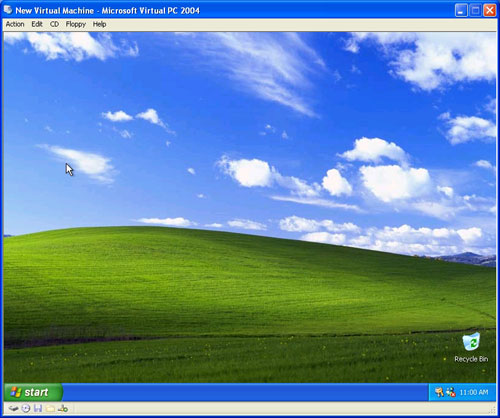
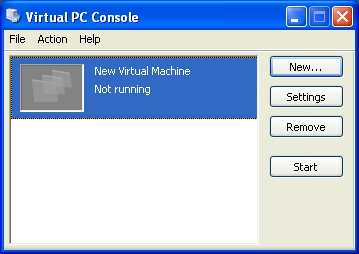
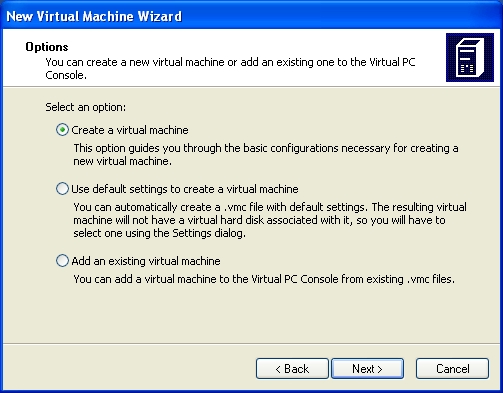
adapted from a SearchWindowsSecurity.com article... Step 1: Microsoft Virtual PCIn case you are not familiar with the concept of a virtual machine, a virtual machine is a software application that is able to run an entire operating system within a self-contained environment on top of Windows. For example, if you look at Figure A, you will see the Windows XP desktop. If you look more closely, though, you will notice Windows running within a window. It's a copy of Windows that is running within a virtual PC. The virtual PC's operating system has no idea that it is running within a virtual PC. In fact, the installation process is identical to what you would normally go through when installing Windows. Of course, Windows XP was used for this particular installation. Figure A In Figure A, the virtual PC is running on top of a product known as Microsoft Virtual PC 2004. It is a Microsoft product that sells for $129. Microsoft also has a similar product that is intended for use on servers, called Virtual Server 2005 R2. Both of these products are now free for anyone who owns the appropriate licenses for the OS being used. Virtual Server 2005 R2 can also run on top of Windows XP, but only in non-production environments. You can download Virtual Server 2005 R2 or Microsoft Virtual PC 2004 Service Pack 1 on the Microsoft site. Microsoft isn't the only game in town when it comes to virtual machines. A company named VMware has been making virtual computer products for far longer than Microsoft. A copy of VMware Workstation sells for $199. VMware also sells a virtual server product that is available for free. Step 2: Deploying Microsoft Virtual PCNow that we know what a virtual computer is and where to get the software, let's see how the setup process works, using Microsoft's Virtual PC. Virtual PC uses a very simple installation wizard that is the same as the one used in many other Microsoft products. When the installation completes, and Virtual PC is up and running, you will see a console that's similar to the one shown in Figure B. Figure B In the figure, you can see that there is a "New Virtual Machine" listing displayed within the console. Virtual PC doesn't give you a virtual machine by default. The virtual machine that is listed is the Windows XP virtual machine shown in Figure A. If you wanted to create a new virtual machine, though, all you would have to do is click the New button. This will start the New Virtual Machine wizard. Click Next, and a screen asks you if you want to create a virtual machine, use the default settings to create a virtual machine or add an existing virtual machine, as shown in Figure C. Figure C If you are using a common operating system, such as Windows XP, then it's best to select the Create a virtual machine option. Click Next and you will be asked to enter a name for your new virtual machine. You can call the machine anything you want, but it's best to give it a descriptive name if you are going to be running more than one machine. In the last paragraph, it was mentioned that if you are running a common operating system, then it is best to select the Create new virtual machine option. That is because when you click the Next button, you are presented with a list of operating systems to choose from. When you select an operating system, you are not installing the operating system. What is happening is that Virtual PC knows the necessary hardware requirements for each listed operating system, and it is able to allocate the proper hardware to the virtual machine without you having to do it manually. Hardware allocation is important because the virtual machine completely isolates itself from the underlying Windows operating system. As such, it needs to reserve RAM for itself and create a virtual hard disk. Click Next, and you will be asked if you want to allocate the recommended amount of RAM or if you would like to make a manual adjustment to the allocated memory. Make your selection and click Next. Then you will be asked if you want to use an existing virtual hard disk or create a new virtual hard disk. Since this is the first virtual machine that you have set up, you could create a new virtual hard disk, or you could point to the Vista VHD that is being distributed for testing at UF. Click Next and you will see a dialog box asking you to confirm the path to the virtual hard disk. The virtual hard disk is nothing more than a file on your machine's hard drive that the virtual machine uses as its hard drive. A virtual hard disk file ends in the .VHD extension. Pay attention to the path that you use, because you will need it later on. Click Next, followed by Finish and the new virtual machine will be created. To run the new virtual machine, just select it from the console shown in Figure B and click the Start button (Virtual PC's Start button, not the Windows Start button). You are now free to install Windows in the usual manner. |